The first step for any espalier is to create a support system to provide a place to tie down limbs and support the weight of the tree and its fruit. You can use any sturdy structure. I choose the posts and wire method because it was inexpensive and relatively easy to put up even with no carpentry skills.
This post is meant to demonstrate one type of support. It is not a step-by-step tutorial so make sure you read all the way through before you start.
Obviously you're going to need to set some wooden posts. How you should
do this will depend very much on your climate so I will leave it to you
to research this yourself. Keep in mind these posts need to be very
sturdy. Imagine a fruit tree full of apples being blow around by a
summer thunderstorm. You need this to withstand quite a bit. In
Wisconsin, we have hard winters with lots of frost heave so these posts
are set 4 feet into the ground and are surrounded by concrete.
 |
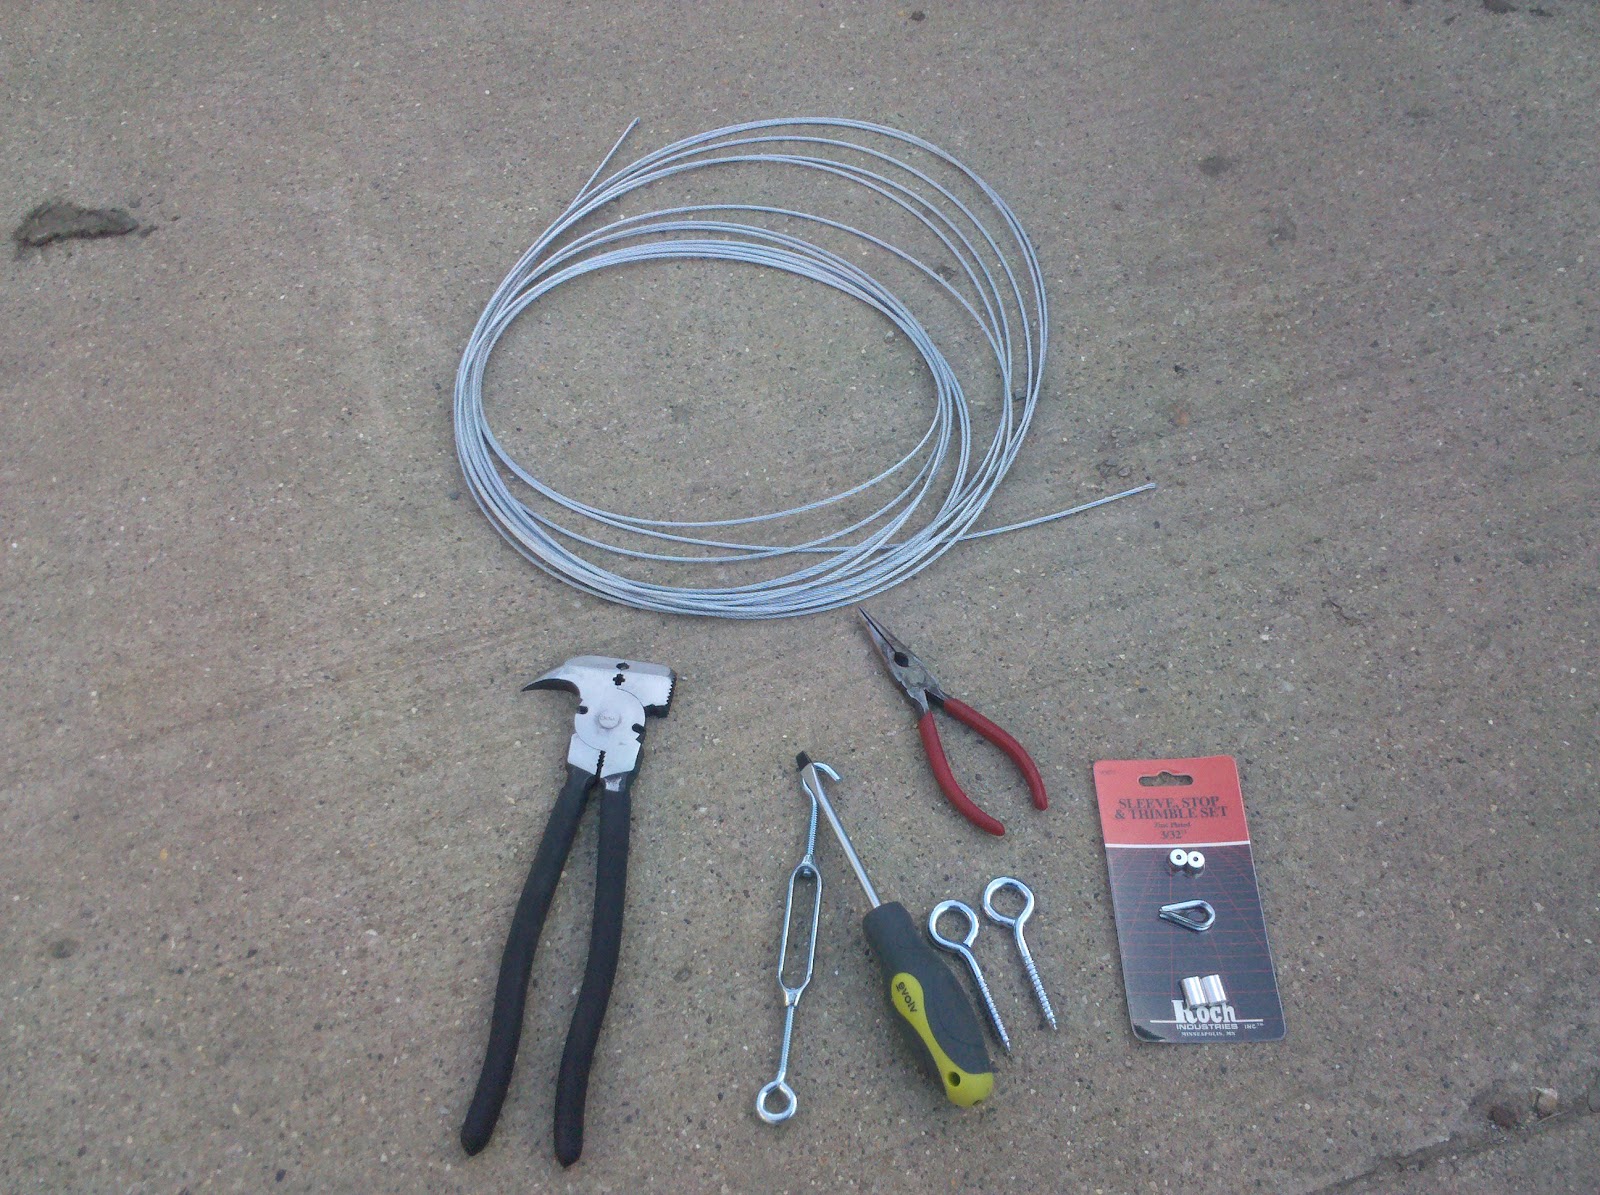
| The stuff you'll need. On top is some braided wire. From left to right: a fencing tool, a turnbuckle, screwdriver, screw eye bolts, pliers, and a thimble, stopper, sleeve set (more on that below) |
Drill some holes the appropriate size for your eye bolts. You want this
to be level so use some string and mark where you need the screw thread
eye bolts.
 |
| Drill a hole appropriate for your eye bolt and hand tighten. |
 |
| Use a screwdriver when the going gets tough. |
 |
Insert the bolts until you run out of threads. Now repeat on the other post opposite this one.
|
 |
| You'll need some special hardware. You can buy a sleeve, stop and thimble set at any store that caters to farmers. |
 |
| These are turnbuckles. The one on the right is "open". Make sure you open all your turnbuckles before you begin. If you don't, the wire will be too short. I learned that the hard way! |
 |
| Measure a length of wire that is two feet longer than the span between your posts. Slide the aluminum sleeve onto the braided wire. |
 |
| Thread the turnbuckle on making sure you have screwed the turnbuckle completely open. |
 |
| Now thread the end of the braided wire through the second hole in the fastener. |
 |
| Now use a fencing tool or a heavy duty pliers to crimp the sleeve together. This crushes the sleeve holding the wire in place. Be sure you apply a LOT of pressure and deform the sleeve. Crimp in three places spaced evenly along the sleeve. |
 |
| This is what the wire should look like once you've crimped the sleeve shut. |
 |
| Now hook the completed turnbuckle assembly onto your eye bolt. |
 |
| Now take the other end of your length of wire and slip a sleeve on. See how it has two channels for the wire to run through. |
 |
| Now thread the wire through the eye bolt and then thread through the open side of the sleeve. |
 |
| Take up the slack in the wire. This is where it is important to have the turnbuckles open. The wire will stretch over time so you need the wire to be fairly taut. As the wire stretches you will be able to further tighten the turnbuckles and keep the wire taut. Now crimp the sleeve shut just like before. |
 |
| Tighten the turnbuckle to make the wire level but don't put too much pressure on the wire or you will warp the posts. |
 |
| Now repeat the process for the other wires and you're done. The wires are a little difficult to see in this photo but I think you get the idea. |
Congratulations! Now you have a strong scaffolding to support your new espalier.


Thanks for the tips! What sort of wire did you use, and was the hardware suitable for use on treated pine posts?
ReplyDeleteI used galvanized wire. If I had it to do again, I would use wire with a plastic sheath. The wire can be abrasive to the branches. I use pieces of old garden hose to protect the trunks but using encased wire would make things a lot easier.
DeleteI'm glad you enjoyed the post.
can u wrap around with used panty hose ?
DeleteSure. That would certainly work. Just be careful not to tie too tightly.
DeleteYou should check out this Espalier system - makes it so much easier. No crimping or turn buckles needed. http://www.lockjaw.co.nz/
ReplyDeleteThanks so much for the information. I will take a look
DeleteIs this system available in the US?
DeleteI have never seen a system like this offered in stores in the US. I have no experience with the Lock Jaw system and have no idea of its effectiveness or durability. I will say that it is a very clever idea and worthy of research.
DeleteHi - quick question, what gauge of wire did you use? Ta.
ReplyDeleteI used braided wire with a 1/8 inch diameter. You could use a single wire as well.
DeleteI would also like to know the wire diameter you used.
ReplyDeleteI used braided wire with a 1/8 inch diameter. You could use a single wire as well.
DeleteI would also like to know the wire diameter you used.
ReplyDeleteI used braided wire with a 1/8 inch diameter. You could use a single wire as well.
Deletedid you use galvanized wire and hooks? If not did you have problems with rusting?
ReplyDeleteI used galvanized wire and turnbuckles. I've had some rusting on the wires but nothing that would affect the wire's ability to support the tree. I'm sure they will need replacing at some point but that shouldn't be too difficult.
DeleteThis comment has been removed by the author.
ReplyDeleteLisa,
DeleteI see you removed your comment. Sorry I took so long to respond. Here are the answers to your questions:
1) How deep are the post holes? They are 4 feet deep
2) Where they secured with concrete? No. I didn't use concrete but they are secured with gravel tamped around them.
It depends greatly on your climate whether or not you have to go to these extremes. In Wisconsin we get a lot of frost heaving so posts have to go quite deep. If you live in a more temperate zone, you might get away with less underground. I recommend you talk to someone who builds fences in your area and ask them how deep you need to go.
I realized that I never replied to your kind response. Okay, so it's 2.5 years later. What's 2.5 years in gardening time? ;) My best recollection is that in rereading the post, I found the answers to my questions. Had I read more carefully, I probably wouldn't have had to make and then delete the question in the first place. Ah, well. I will learn eventually!
DeleteThanks for having this blog and answering so many questions.
It's my pleasure! I'm glad that people are finding it useful!
DeleteI have 3 sections of 4 meters. Each section separated by a pole (so 4 poles). How many turnbuckles would I need for that. 1 for each section or could i span the wire across 12m (through eyelets in each section pole) and just have 1 turnbuckle at the end?
ReplyDeleteI am planning on having 2 citrus trees per section (6 trees).
thanks
If you have a large enough turnbuckle, you could use just one for each 12 meter span. I used a turnbuckle for each 4 meter span and I regret it. It makes tightening things quite complex because each time you tighten one spot, others loosen.
DeleteHow are your espalier trees doing? I'm planning to plant a few this year. Could you tell me what size turnbuckles you used?
ReplyDeleteThe espaliers are doing great. The peach produces more than I can use. The Ubileen pear has been temperamental, possibly because it isn't getting enough light. The Karl's Favorite has produced enough for fresh eating which was my entire goal.
DeleteAs far as turnbuckles, see the comment and reply above. If I had to do it all over again, I would use only four turnbuckles by passing the wire completely through the inner posts. I would invest in larger turnbuckles because I've already had to tightened some of them because the wires stretched and I had no more room to tightened the turnbuckles. It really depends on the span of wire that you are planning to use. Smaller spans can use smaller turnbuckles.
How far apart are your wires? I'm planning to do an apple, a pear, and a plum. Thanks for the great site!
ReplyDeleteThe wires are 15 inches apart but if I had to do it again I would increase that to at least 18 inches apart. I would also start higher off the ground to avoid rabbits chewing the arms
DeleteThanks for the helpful post. Did you use turnbuckles at both ends of the posts?
ReplyDeleteWell it’s been more than a year since your comment! Sorry. I used a turnbuckle for each and every span of wire between posts.
DeleteWhat is the spacing on your trees? And can you help me understand how many of each variety I need to have for them to fruit? I just bought a crabapple espalier on clearance at my local garden center and now I’m obsessed with adding real fruit trees and doing my fence line. Thanks for the super helpful instructions!
ReplyDeleteHow far apart and what varieties to use are very dependent on your climate. Most places will have a county extension office that can help with these questions. Spacing will depend on. the variety as well. These are 8 feet apart which is fine for the semi dwarf pears but the peach requires fairly draconian pruning every year.
DeleteThanks for all the information. I'm building 3 supports this month for fig, peach and lemon and have been looking for the post spacing. I'll go with 10 feet. The fig and peach will be together made with 3 posts so I can hopefully extend the wire 20 ft with a large turnbuckle. One note for others. I think nonbraided wire will stretch less. I'll use 12 guage.
ReplyDeleteAll very good advice! I put my posts and plants much too close together. I got greedy trying to get three plants in such a small space. It does still work but I think I'd get even more fruit if I had crowded them less.
DeleteLove this thread that just keeps going. I have nice wood fence in my yard and am wondering if I can just screw eyelets into that and run wire, or if I need to sink separate posts to ensure the trees get proper airflow behind them. Nursery said make sure the trees are at least a foot from the fence, but I would love to not have to sink new posts if possible. Are fungal issues a real problem?
ReplyDeleteI see that I didn't actually reply to your comment but published another comment. Here's the answer: Fungal issues will depend on your location and climate. If a nearby nursery suggests one foot, I’d go with that. You could also choose a variety that is very fungal resistant but remember this is an investment in time. You don’t want to get to year six and discover fungal illness is stealing your harvest. I still regret not biting the bullet and moving one of my trees six inches instead of just letting the trunk bend. I was just so tired after building all that I convinced myself it would be fine. The tree is fine it just bothers me!
DeleteFungal issues will depend on your location and climate. If a nearby nursery suggests one foot, I’d go with that. You could also choose a variety that is very fungal resistant but remember this is an investment in time. You don’t want to get to year six and discover fungal illness is stealing your harvest. I still regret not biting the bullet and moving one of my trees six inches instead of just letting the trunk bend. I was just so tired after building all that I convinced myself it would be fine. The tree is fine it just bothers me!
ReplyDeleteHere’s an update for those who are interested. The cedar posts rotted through last year and instead of repairing them I decided to chance it and simply remove the supports. The trees are free standing now. The biggest danger is wind at this point but it is in a very protected location. I may regret this very much when a tree topples but, for now, I’m taking my chances. I may install a single metal electrical conduit behind each trunk just for insurance. I can just pound those in and they are quite sturdy in my clay subsoil.
ReplyDelete